
Chapter 10: PNG Output
Contents
10.1 PNG Format Overview
The Portable Network Graphics format, or PNG, is based on a lossless compression algorithm and supports a variety of color schemes including true colors. This makes it a viable alternative to both JPEG and GIF formats.
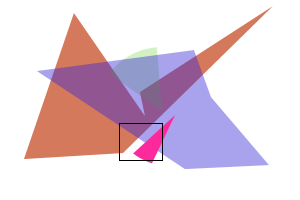
JPEG's lossy compression algorithm works well on photographs but performs quite poorly on images with sharp edges, such as drawings, charts and graphs. The "random art" image below was saved as JPEG and PNG. The former shows some unsightly artifacts while the latter is nice and clean.


Unless animation is needed, PNG is a much better alternative to GIF as well. While the latter uses lossless compression, it only supports palettes of up to 256 colors and therefore is unsuitable for high-quality photographic images. PNG, on the other hand, supports both palette-based and true colors. PNG's support for transparency is far better than GIF's as well.
Unlike any other common image format, PNG allows for the partial transparency of individual pixels by optionally storing a 4th data channel, also known as the alpha channel, for each pixel in addition to the RGB data. The use of the alpha channel for image stamping was covered in Section 6.3 of this user manual.
10.2 AspJpeg.NET's Support for PNG Output
AspJpeg.NET is capable of saving images in PNG format. All you need to do is set the property PNGOutput to true before calling Save (or SendBinary/Binary).
If the currently opened image has an alpha channel, it will be automatically preserved when the image is saved as a PNG. If the image is resized, its alpha channel is resized also.
The following code sample resizes the sample PNG image realty.png used in Chapter 6 and preserves its alpha channel.
<%@ Import Namespace="Persits.Jpeg"%>
<html>
<head>
<title>AspJpeg.NET User Manual Chapter 10 - PNG Output</title>
<script runat="server" languge="C#">
void Page_Load( Object Source, EventArgs E)
{
// Create instance of JpegManager
JpegManager objJpeg = new JpegManager();
string strPath = Server.MapPath("../images/realty.png");
OriginalImage.ImageUrl = "../images/realty.png";
JpegImage objImage = objJpeg.OpenImage( strPath );
objImage.PreserveAspectRatio = true;
objImage.Width = objImage.OriginalWidth / 2;
// Save as PNG
objImage.PNGOutput = true;
string strFilename =
objImage.SaveUnique(Server.MapPath("realty_small.png"));
OutputImage.ImageUrl = strFilename;
}
</script>
</head>
<form runat="server" style="background-color: aqua">
<asp:image runat="server" id="OriginalImage"/><br /><br />
<asp:image runat="server" id="OutputImage"/>
</form>
</html>
<%@ Import Namespace="Persits.Jpeg"%>
<html>
<head>
<title>AspJpeg.NET User Manual Chapter 10 - PNG Output</title>
<script runat="server" languge="vb">
Sub Page_Load(Source As Object, E As EventArgs)
' Create instance of JpegManager
Dim objJpeg As JpegManager = New JpegManager()
Dim strPath As String = Server.MapPath("../images/realty.png")
OriginalImage.ImageUrl = "../images/realty.png"
Dim objImage As JpegImage = objJpeg.OpenImage(strPath)
objImage.PreserveAspectRatio = True
objImage.Width = objImage.OriginalWidth / 2
' Save as PNG
objImage.PNGOutput = True
Dim strFilename As String =
objImage.SaveUnique(Server.MapPath("realty_small.png"))
OutputImage.ImageUrl = strFilename
End Sub
</script>
</head>
<form runat="server" style="background-color: aqua">
<asp:image runat="server" id="OriginalImage"/><br /><br />
<asp:image runat="server" id="OutputImage"/> </form> </html>
Click the links below to run this code sample:
10.3 Alpha Channel Management
AspJpeg.NET enables you to set a new alpha channel for the image, and also remove an existing one, via the methods SetAlpha and RemoveAlpha, respectively. It also allows you to modify the alpha channel in several ways.
10.3.1 SetAlpha and RemoveAlpha Methods
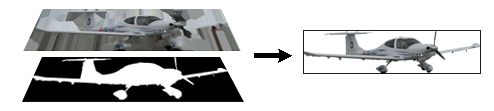
The SetAlpha method expects two arguments: an instance of the JpegImage object representing the alpha channel, and a Boolean flag specifying whether the alpha values should be inversed.
The image representing the alpha channel must have the same dimensions as the image to which it is assigned, and be in grayscale color space (i.e. 1 byte per pixel.) If the 2nd argument is false, the color value of 0 (black) of the alpha channel image corresponds to full transparency, and the color value of 255 (white) to full opacity. If the 2nd argument is true, 255 corresponds to full transparency and 0 to full opacity.
For example, the following code snippet creates a red image with a fully transparent round hole by using another image with a filled circle as the alpha channel:
Here is the output image shown on a blue background to make its transparency more obvious:
Here is the output image shown on a blue background with a white border to make its transparency more obvious:

If the 2nd argument to SetAlpha is changed to True, the output will be as follows:

The alpha channel image must be in the grayscale color space. That is why the script above calls the method ToGrayscale. Failure to call this method would result in an exception since images created with the CreateImage method are always RGB.
The SetAlpha method also allows the 1st argument to be null. In that case, the alpha channel will be set evenly to 255 (full opacity) for all pixels if the 2nd argument is false, and to 0 (full transparency) if true.
To remove an existing alpha channel, call RemoveAlpha. This method has no arguments. If the current image has no alpha channel, calling this method has no effect. To check if the current image has an alpha channel, use the Boolean property AlphaExists.
10.3.2 AlphaPixels Property
You can read and change the individual pixels of the current alpha channel via the parameterized property AlphaPixels, for example:
or
The property sets and returns values in the range 0 to 255.
10.3.3 Drawing on Images with Alpha Channel

Various Canvas methods such as DrawLine or PrintText can be used on an image whether it has an alpha channel or not. However, if the graphics or text being drawn falls on a fully transparent area of the image, it will not be visible on the resultant PNG.
To ensure the 100%-visibility of the text or graphics being drawn, the alpha channel has to be modified also to provide an opaque background for the drawing. The same text or graphics needs to be drawn separately on the alpha channel in white color (which designates full opacity).
The method AlphaToImage turns the alpha channel of an image into an independent image with a Canvas object of its own, which can be drawn on.
The image above was created with the following code snippet. It opens a PNG image with an alpha channel, separates its alpha channel into a separate JpegImage object, draws some text on the original image and the alpha channel image, and merges the modified alpha channel with the original image, thus ensuring that the text is fully visible on the resultant PNG.
<%@ Import Namespace="Persits.Jpeg"%>
<html>
<head>
<title>AspJpeg.NET User Manual Chapter 10 - Drawing on Alpha</title>
<script runat="server" languge="C#">
void Page_Load( Object Source, EventArgs E)
{
JpegManager objJpeg = new JpegManager();
JpegImage objImage =
objJpeg.OpenImage(Server.MapPath("../images/realty.png"));
// Path to font
string strFont = objJpeg.WindowsDirectory + @"\Fonts\Arial.ttf";
// Print on image
objImage.Canvas.PrintText("Some text", 50, 20, strFont);
// Print on alpha channel by creating a separate object
JpegImage objAlpha =
objJpeg.OpenImage(Server.MapPath("../images/realty.png"));
objAlpha.AlphaToImage(); // populate image with alpha channel
objAlpha.ToRGB(); // make it RGB so that we can print on it
objAlpha.Canvas.Font.Color = 0xFFFFFF; // white color!
objAlpha.Canvas.PrintText("Some text", 50, 20, strFont);
objAlpha.ToGrayscale(1); // turn back into grayscale
objImage.SetAlpha(objAlpha, false);
// Output as PNG
objImage.PNGOutput = true;
string strFilename =
objImage.SaveUnique(Server.MapPath("realty_small.png"));
OutputImage.ImageUrl = strFilename;
}
</script>
</head>
<form runat="server">
<asp:image runat="server" id="OutputImage"/>
</form>
</html>
<%@ Import Namespace="Persits.Jpeg"%>
<html>
<head>
<title>AspJpeg.NET User Manual Chapter 10 - Drawing on Alpha</title>
<script runat="server" languge="vb">
Sub Page_Load( Source As Object , E As EventArgs)
Dim objJpeg As JpegManager = new JpegManager()
Dim objImage As JpegImage =
objJpeg.OpenImage(Server.MapPath("../images/realty.png"))
' Path to font
Dim strFont As String =
objJpeg.WindowsDirectory + "\Fonts\Arial.ttf"
' Print on image
objImage.Canvas.PrintText("Some text", 50, 20, strFont)
' Print on alpha channel by creating a separate object
Dim objAlpha As JpegImage =
objJpeg.OpenImage(Server.MapPath("../images/realty.png"))
objAlpha.AlphaToImage() ' populate image with alpha channel
objAlpha.ToRGB() ' make it RGB so that we can print on it
objAlpha.Canvas.Font.Color = &HFFFFFF ' white color!
objAlpha.Canvas.PrintText("Some text", 50, 20, strFont)
objAlpha.ToGrayscale(1) ' turn back into grayscale
objImage.SetAlpha(objAlpha, False)
' Output as PNG
objImage.PNGOutput = True
Dim strFilename As String =
objImage.SaveUnique(Server.MapPath("realty_small.png"))
OutputImage.ImageUrl = strFilename
End Sub
</script>
</head>
<form runat="server">
<asp:image runat="server" id="OutputImage"/>
</form>
</html>
Click the links below to run this code sample:

10.3.4 Alpha Channel Flattening
AspJpeg.NET offers the method FlattenAlpha which applies the image's alpha channel to its pixels in combination with the specified background color and then removes the alpha channel, thus effectively "flattening" the image. The method has the same effect as drawing the image on top of a monochrome background of equal size.
The FlattenAlpha method expects a single argument, the background color in the form of a long integer.
If the image has no alpha channel, this method has no effect. This method is useful for converting arbitrary PNG images (regardless of their alpha channel presence) to JPEG format.
For example:
10.3.5 Alpha Channel for GIF Images
AspJpeg.NET treats GIF images with a transparency as if they were PNG images with an alpha channel. That is, when JpegImage objImage = JpegManager.OpenImage is called on a GIF image which contains a transparency color, the property objImage.AlphaExists returns true and all alpha-related methods described above are available. This makes it easy to convert a GIF image with a transparency to a PNG image with an alpha channel and also perform cropping, rotation and other operations on a GIF image while preserving its transparency information.
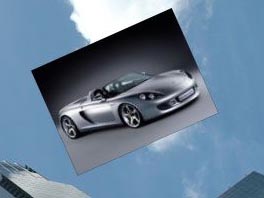
10.4 Using PNG Format for Image Rotation
AspJpeg.NET is capable of rotating images by an arbitrary degree via the method Rotate. The method expects two arguments: the rotation angle in degrees, and fill color. When this method is called, the original image is rotated and the image canvas is increased both horizonally and vertically to accommodate the slanted picture. The four triangular corner areas thus formed are filled with the specified color. For example:

If the rotated image is to be drawn on top of another picture, the corner areas should usually be removed entirely. The Rotate method achieves this by creating an alpha channel for the rotated image making the corner areas fully transparent. To take advantage of the alpha channel, the rotated image needs to be saved in PNG format (i.e. the PNGOutput property should be set to True.)
The PNG image can then be drawn on top of another picture via the DrawImage method of the JpegCanvas object as described in Section 6.1.
The following image was created by the script below.
<%@ Import Namespace="Persits.Jpeg"%>
<html>
<head>
<title>AspJpeg.NET User Manual Chapter 10 - Image Rotation</title>
<script runat="server" languge="C#">
void Page_Load( Object Source, EventArgs E)
{
// Create instance of JpegManager
JpegManager objJpeg = new JpegManager();
JpegImage objRotatedImg =
objJpeg.OpenImage(Server.MapPath("../images/porsche.jpg"));
// Rotate 24 degrees, black background
objRotatedImg.Rotate(24, 0);
objRotatedImg.PNGOutput = true;
JpegImage objImage =
objJpeg.OpenImage( Server.MapPath("../images/photo.jpg"));
objImage.Canvas.DrawImage(410, 50, objRotatedImg);
string strFilename =
objImage.SaveUnique(Server.MapPath("rotated.jpg"));
OutputImage.ImageUrl = strFilename;
}
</script>
</head>
<form runat="server">
<asp:image runat="server" id="OutputImage"/>
</form>
</html>
<%@ Import Namespace="Persits.Jpeg"%>
<html>
<head>
<title>AspJpeg.NET User Manual Chapter 10 - Image Rotation</title>
<script runat="server" languge="vb">
Sub Page_Load( Source As Object, E As EventArgs)
' Create instance of JpegManager
Dim objJpeg As JpegManager = new JpegManager()
Dim objRotatedImg As JpegImage =
objJpeg.OpenImage(Server.MapPath("../images/porsche.jpg"))
' Rotate 24 degrees, black background
objRotatedImg.Rotate(24, 0)
objRotatedImg.PNGOutput = True
Dim objImage As JpegImage =
objJpeg.OpenImage( Server.MapPath("../images/photo.jpg"))
objImage.Canvas.DrawImage(410, 50, objRotatedImg)
Dim strFilename As string=
objImage.SaveUnique(Server.MapPath("roated.jpg"))
OutputImage.ImageUrl = strFilename
End Sub
</script>
</head>
<form runat="server">
<asp:image runat="server" id="OutputImage"/>
</form>
</html>
Click the links below to run this code sample:

