
Chapter 6: Picture-in-Picture
Contents
6.1 Image Drawing
6.1.1 DrawImage Method
AspJpeg.NET enables you to place images on top of each other via the method JpegCanvas.DrawImage. The most basic overload of this method expects three arguments: the X and Y offsets relative the upper-left corner of the background image, and another instance of the JpegImage object representing the image to be drawn.
JpegImage objBackground = objJpeg.OpenImage( strPath1 );
JpegImage objImage = objJpeg.OpenImage( strPath2 );
objBackground.Canvas.DrawImage( 10, 10, objImage );
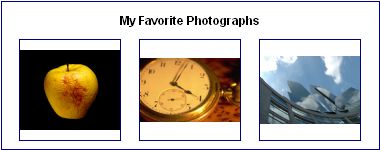
The following code sample creates a "front page" for an online album which contains the album title (aligned to the center) and up to 3 thumbnails of the images read from a folder.
To create a blank image, the JpegManager.CreateImage method is used which accepts the image dimensions and background color as arguments. To align a text string to the right, the method JpegCanvas.GetTextExtent is used.
<%@ Import Namespace="System.IO"%>
<%@ Import Namespace="Persits.Jpeg"%>
<html>
<head>
<title>AspJpeg.NET User Manual Chapter 6 - Picture-in-Picture</title>
<script runat="server" languge="C#">
void Page_Load( Object Source, EventArgs E)
{
// Source directory with images
string strPath = Server.MapPath("../images");
// Ablum title
string strTitle = "My Favorite Photographs";
// Create instance of JpegManager
JpegManager objJpeg = new JpegManager();
// Font path
string strFont = objJpeg.WindowsDirectory + @"\Fonts\arial.ttf";
// Create blank image for front page, white background
JpegImage objBkImage = objJpeg.CreateImage(380, 150, 0xFFFFFFFF);
// Draw 1-pixel blue frame
objBkImage.Canvas.Pen.Color = 0x000080;
objBkImage.Canvas.Pen.Width = 2;
objBkImage.Canvas.DrawRect(1, 1,
objBkImage.Width-2, objBkImage.Height-2);
// Draw album title
objBkImage.Canvas.Font.Size = 14;
int nTitleWidth = objBkImage.Canvas.GetTextExtent(strTitle, strFont);
objBkImage.Canvas.PrintText(strTitle,
(objBkImage.Width - nTitleWidth) / 2, 24, strFont);
// Enumerate images in the source directory
String[] files = Directory.GetFiles( strPath, "*.*");
int nCount = 0;
foreach (string strFile in files)
{
String strExt = Path.GetExtension(strFile).ToUpper();
if (strExt != ".JPG" && strExt != ".GIF" &&
strExt != ".TIF" && strExt != ".PNG")
continue;
// Draw this image on front page
JpegImage objImage = objJpeg.OpenImage(strFile);
// Resize to inscribe in 100x100 square
objImage.PreserveAspectRatio = true;
if(objImage.OriginalWidth>100 || objImage.OriginalHeight>100)
{
if (objImage.OriginalWidth > objImage.OriginalHeight)
{
objImage.Width = 100;
}
else
{
objImage.Height = 100;
}
}
int X = 20 + 120 * nCount;
int Y = 40;
// Center image inside frame vert or horiz as needed
objBkImage.Canvas.DrawImage(X + (100 - objImage.Width) / 2,
Y + (100 - objImage.Height) / 2, objImage);
// Draw frame for each thumbnail
objBkImage.Canvas.Pen.Width = 1;
objBkImage.Canvas.DrawRect(X - 1, Y - 1, 100, 100);
// Limit total images drawn to 3
nCount++;
if (nCount >= 3)
break;
}
string strFilename =
objBkImage.SaveUnique(Server.MapPath("frontpage.jpg"));
OutputImage.ImageUrl = strFilename;
}
</script>
</head>
<form runat="server">
<asp:image runat="server" id="OutputImage"/>
</form>
</html>
<%@ Import Namespace="System.IO"%>
<%@ Import Namespace="Persits.Jpeg"%>
<html>
<head>
<script runat="server" languge="vb">
Sub Page_Load(Source As Object, E As EventArgs)
' Source directory with images
Dim strPath As String = Server.MapPath("../images")
' Ablum title
Dim strTitle As String = "My Favorite Photographs"
' Create instance of JpegManager
Dim objJpeg As JpegManager = New JpegManager()
' Font path
Dim strFont As String=objJpeg.WindowsDirectory+"\Fonts\arial.ttf"
' Create blank image for front page, white background
Dim objBkImage As JpegImage =
objJpeg.CreateImage(380, 150, &HFFFFFFF)
' Draw 1-pixel blue frame
objBkImage.Canvas.Pen.Color = &H80
objBkImage.Canvas.Pen.Width = 2
objBkImage.Canvas.DrawRect(1, 1,
objBkImage.Width - 2, objBkImage.Height - 2)
' Draw album title
objBkImage.Canvas.Font.Size = 14
Dim nTitleWidth As Integer =
objBkImage.Canvas.GetTextExtent(strTitle, strFont)
objBkImage.Canvas.PrintText(strTitle,
(objBkImage.Width - nTitleWidth) / 2, 24, strFont)
' Enumerate images in the source directory
Dim files() As String = Directory.GetFiles(strPath, "*.*")
Dim nCount As Integer = 0
For Each strFile As String In files
Dim strExt As String = Path.GetExtension(strFile).ToUpper()
If strExt <> ".JPG" And strExt <> ".GIF" And
strExt <> ".TIF" And strExt <> ".PNG" Then
Continue For
End If
' Draw this image on front page
Dim objImage As JpegImage = objJpeg.OpenImage(strFile)
' Resize to inscribe in 100x100 square
objImage.PreserveAspectRatio = True
If objImage.OriginalWidth>100 Or objImage.OriginalHeight>100 Then
If objImage.OriginalWidth > objImage.OriginalHeight Then
objImage.Width = 100
Else
objImage.Height = 100
End If
End If
Dim X As Integer = 20 + 120 * nCount
Dim Y As Integer = 40
' Center image inside frame vert Or horiz as needed
objBkImage.Canvas.DrawImage(X + (100 - objImage.Width) / 2,
Y + (100 - objImage.Height) / 2, objImage)
' Draw frame for each thumbnail
objBkImage.Canvas.Pen.Width = 1
objBkImage.Canvas.DrawRect(X - 1, Y - 1, 100, 100)
' Limit total images drawn to 3
nCount = nCount + 1
If nCount >= 3 Then Exit For
Next
Dim strFilename As String =
objBkImage.SaveUnique(Server.MapPath("frontpage.jpg"))
OutputImage.ImageUrl = strFilename
End Sub
</script>
</head>
<form runat="server">
<asp:image runat="server" id="OutputImage"/>
</form>
</html>
Click the links below to run this code sample:

6.1.2 Opacity & Transparency
The DrawImage method also provides three optional arguments to specify opacity and transparency parameters.
When the basic overload of the DrawImage method described above is called, the image being drawn is fully opaque (non-transparent), unless it has an alpha channel (discussed below). To draw the image with an arbitrary degree of transparency, the overloaded version of DrawImage which expects a fourth argument of the type double should be called. This fourth argument controls the opacity of the image being drawn. It is a number between 0 and 1. The value of 0 means the image is to be displayed fully transparent (invisible), and 1 fully opaque.
The following code draws an image at 50% opacity:
Certain pixels of an image can be made transparent when this image is placed on top of another image. The color of pixels to be made transparent is specified via yet another overload of the DrawImage method, which takes a fourth argument of the type uint. The following code makes all red pixels of an image transparent when displayed on top of another image:
Since JPEG uses lossy compression, pixel colors often get slightly distorted (although it may not be visible to the human eye). For example, one or all color components of a pixel may change from 255 (FF) to 254 during JPEG compression. To accommodate for this distortion, there is yet another DrawImage overload that in addition to the transparency color, also takes an allowable deviation from that color. This number must be between 0 and 255 and affects all three color components of a pixel. For example, the following code turns transparent all pixels in the range 0x16D636 to 0x2AEA4A:
Finally, there is a DrawImage overload that takes all the arguments described above at once. The following code makes all the red pixels with the deviation of 15 fully transparent, plus applies a 30% opacity to all other pixels.
6.2 PNG Alpha Channel & GIF Transparency
Portable Network Graphics format, also known as PNG, allows each pixel to have an additional data component (alpha channel) which represents this pixel's degree of transparency. Thus, an RGB image becomes RGBA where "A" stands for alpha channel. The alpha value for each pixel can be any number between 0 and 255. This enables alpha-enabled PNG images to blend well with any background (see images below).
The DrawImage method described above, when given a PNG image with an alpha channel, takes the alpha channel into account automatically. If the Opacity argument is also specified, this value is applied to each pixel in addition to the alpha channel values. This feature is especially useful for applications that need to "stamp" images with a logo.
Original logo:

Logo drawn as a transparent GIF: poor blending.

Logo drawn as a PNG with alpha channel: smooth blending.

If the background image has an alpha channel as well, the DrawImage method takes into account both alpha channels.
Live Demo #6 demonstrates logo stamping with the help of the DrawImage method.
PNG output is described in Chapter 10.
In addition to supporting PNG alpha channel, the DrawImage method also supports GIF transparency. GIF format only allows a single color to be designated as transparent. It does not support variable-degree transparency. Therefore, GIF format is not well suited to be used for smooth logo stamping, as the middle image above demonstrates.
6.3 Perspective Projection
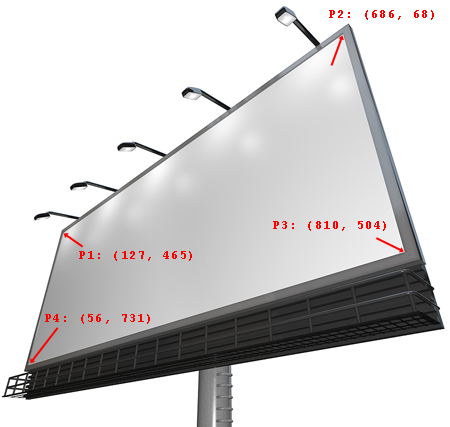
AspJpeg.NET allows an image being drawn to be stretched into an arbitrary quadrilateral area defined by its four corners. This feature enables you to create a perspective effect when rendering the image on top of another picture such as the photograph of a billboard shown below:

To apply perspective projection to an image, the DrawImage method described above still needs to be used, but prior to calling this method you need to define a path consisting of exactly 4 points by calling the method MoveTo followed by 3 calls to LineTo. The 4 points of the path define the quadrilateral area on the main image within which the smaller image is rendered when DrawImage is called. The first point of the path corresponds to the upper-left corner of the smaller image.
Using any image editor such as Microsoft Paint or Photoshop, determine the coordinates of the 4 points within your background image (designated P1, P2, P3 and P4 on the picture below) in a clockwise order starting with the upper-left corner, as follows:
Use these coordinates in your script, as follows:
<%@ Import Namespace="Persits.Jpeg"%>
<html>
<head>
<title>AspJpeg.NET User Manual Chapter 6 - Perspective Projection</title>
<script runat="server" languge="C#">
void Page_Load( Object Source, EventArgs E)
{
// Create instance of JpegManager
JpegManager objJpeg = new JpegManager();
string strBkPath = Server.MapPath("../images/billboard.jpg");
string strPath = Server.MapPath("../images/clock.jpg");
// Open both images
JpegImage objBackground = objJpeg.OpenImage( strBkPath );
JpegImage objImage = objJpeg.OpenImage( strPath );
JpegCanvas objCanvas = objBackground.Canvas;
// Create path: must contain 4 points, start with upper-left corner
objCanvas.MoveTo( 127, 465 );
objCanvas.LineTo( 686, 68 );
objCanvas.LineTo( 810, 504 );
objCanvas.LineTo( 56, 731 );
// Draw image. 1nd and 2nd arguments (X and Y) are ignored.
objCanvas.DrawImage( 0, 0, objImage );
string strFilename = objBackground.SaveUnique(
Server.MapPath("perspective.jpg"));
OutputImage.ImageUrl = strFilename;
}
</script>
</head>
<form runat="server">
<asp:image runat="server" id="OutputImage"/>
</form>
</html>
<%@ Import Namespace="Persits.Jpeg"%>
<html>
<head>
<script runat="server" languge="vb">
Sub Page_Load( Source As Object, E As EventArgs)
' Create instance of JpegManager
Dim objJpeg As JpegManager = New JpegManager()
Dim strBkPath As String = Server.MapPath("../images/billboard.jpg")
Dim strPath As String = Server.MapPath("../images/clock.jpg")
' Open both images
Dim objBackground As JpegImage = objJpeg.OpenImage(strBkPath)
Dim objImage As JpegImage = objJpeg.OpenImage(strPath)
Dim objCanvas As JpegCanvas = objBackground.Canvas
' Create path: must contain 4 points, start with upper-left corner
objCanvas.MoveTo(127, 465)
objCanvas.LineTo(686, 68)
objCanvas.LineTo(810, 504)
objCanvas.LineTo(56, 731)
' Draw image. 1nd and 2nd arguments (X and Y) are ignored.
objCanvas.DrawImage( 0, 0, objImage )
Dim strFilename As String =
objBackground.SaveUnique(Server.MapPath("perspective.jpg"))
OutputImage.ImageUrl = strFilename
End Sub
</script>
</head>
<form runat="server">
<asp:image runat="server" id="OutputImage"/>
</form>
</html>
Click the links below to run this code sample:
Note that when the DrawImage method is used in the "perspective projection mode", only the Image and Opacity arguments are used while all others are ignored.

